Category Archives: Injury Prevention, Recovery, Healing, and Performance Enhancement

Total Immersion: Ankle Mobility

Ankle mobility is important for swimming well and with the least drag. Swimming with your feet not pointed behind you means you have two feet that are creating drag as you swim.
Sometimes it’s a motor control problem. You tell the swimmer to keep the toes pointed behind them and they imprint it, and just keep doing it. They don’t have any inherent mobility problem but rather they just weren’t keeping their attention on it, and now they are and they can do it.
For others, pointing the toes behind them as swim can be hard if not impossible. This is because they have restrictions in their muscles and soft tissues around the ankle that hold them in their normal bent position and getting out of that position can take a lot of effort if the soft tissues aren’t addressed. If you ask these swimmers to point their toes, they will either 1) point for a few strokes but when they get tired they revert back to not pointing, or 2) they will cramp their calves which will be overworked to keep their toes pointed.
Watch this video for some ideas on increasing your ankle mobility:

Total Immersion: The Dead Bug

The Dead Bug is a funny name for a pretty important exercise. It is called Dead Bug because you lie on the floor with your arms and legs up in the air, just like how dead bugs look when they are dead and lying on their backs.
I first learned the Dead Bug from Original Strength. Then I cruised through physical therapy sites and Youtube and found a myriad of variations of the Dead Bug. In this video, I distilled some info about how to do the Dead Bug, and how to build yourself up to the hardest version of the Dead Bug. Certainly there are other variants available to try; I picked some of the more useful ones and put them here.
Key to executing the Dead Bug correctly is the ability to stabilize the torso. While many of us know how to do this with what we like to call a “high level strategy”, meaning squeezing the heck out of every muscle around our torso, yes it accomplishes the task but unfortunately it uses so much energy and restricts your ability to breathe. Thus, we need to train our ability to stabilize with a “low level strategy”, one that creates enough stability for general movement tasks and does not require so much energy and effort. A “high level” stabilization strategy is still important and required in some cases, like attempting a maximal lift of an object. But you shouldn’t be using the same level of energy and effort for things like bending down and picking up a pencil…or swimming.
The other value of the Dead Bug is that it trains our nervous system and re-encourages our coordination in using the cross pattern of moving our limbs. The cross pattern is when our left arm moves with the right leg, and right arm moves with the left leg. This pattern is so important to the normal functioning of a human being; we use it every day for moving but our 21st century lives have cause severe atrophy in this essential skill. Re-educating and reinforcing that with the Dead Bug will increase your ability to learn new movement skills and improve your swimming greatly.
Note that Dead Bugs are especially great for those have over extended backs. There are many reasons why people exhibit over extended backs. One of the possible reasons is lack of proper activation in the anterior muscles and structures of the torso. Without proper activation, they cannot lock their rib cage down to their pelvis. The entire region below the rib cage essentially opens up, and the lumbar spine behind becomes extended. Dead Bugs activate and stimulate the anterior structures, and trains the torso to stabilize in neutral spine position.
Take a look at this video on The Dead Bug:

Avoiding Car Seat Hell

A user on the mobilitywod forums posted about problems they were having while driving. I can relate. I think all car seats are ergonomically deficient. You’d think someone would have done something better after all this time, but they are terrible. The user was complaining of tight neck and shoulders. Here was my reply:
When you drive a lot, your body can get stuck in a bad position. If the steering wheel is too far forward, it can drag the shoulders forward with it. Holding the arms on the steering wheel can create tension in the arms and shoulders. Most car seats are poorly shaped. They are concave and the head rest kicks the head/neck forward. The concavity in bucket seats pushes the shoulders forward. The way the back is not optimally shaped to cause the pelvis to roll into posterior tilt, causing the entire spine to have problems. If someone spends a lot of time in this bad position, the body will rebel.
Here are some forward head on neck videos (from mobilitywod.com):
Episode 169: Forward Head on Neck
Episode 109: The Neck of a Desk Warrior
Work the thoracic spine – I’m sure it’s stiff:
Episode 294: Shoulder What to Fix First and Wii Mob
For some trapezoid work, I’d stick two lacrosse balls, one under each trap and lay on them. Arch the butt up but keep good torso position. Then move the arms overhead and around in snow angel fashion. Move the balls for optimal effect.
The other suggestions would be alterations to her car seat setup.
1. I use the Gokhale Method StretchSit cushion. It hangs nicely down from the head rest supports. However, it is usually not enough by itself in today’s bad car seats. I use some big rubber bands and attach a paperback to the back of the pillow which pushes the body forward enough to clear the wings of a typical car seat.
I would not recommend a lumbar support. It pushes the lumbar spine into extension and does not solve the shoulders pushed forward problem.
Note that this cushion should not be placed at the bottom but rather it should center around the junction between the t-spine and lumbar spine. This allows the butt to push further back and prevents posterior tilt of the pelvis. It also puts the body into a more upright position.
This then allows the head to be more upright and not be kicked forward by the bad head rest. You can still rest the head on the headrest, but the head/neck will be aligned properly on top of the spine.
2. Move the seat forward so that you are not reaching for the steering wheel. Get it as close to your body as you can get it. You may need to slide the seat back to get out of the car, but then slide it back forward when you get back in to drive. This prevents the shoulders from reaching forward and getting wiped out from holding them up there so much. Find the seat position where you can reach the steering wheel AND still have the shoulders in good position, and not forward.

The New Alleva-Wave (Versus the Old Alleva-Wave and Somapulse): Healing via Pulsed Electro-Magnetic Fields

In my previous post Somapulse/Alleva-Wave: Healing and Recovery via Pulsed Electro-Magnetic Fields, I talked about my success in using Pulsed Electromagnetic Fields (PEMF) to heal a bunch of physical problems like a strained elbow and removing DOMS. It’s pretty awesome technology and I am still amazed the PEMF treatments with either the Somapulse or Alleva-Wave actually works when other things don’t.
Last week I got my hands on the new Alleva-Wave. Here is a pic of it:

Note that this version is half the size of the original Alleva-Wave, which used the same form factor as the Somapulse:

I’m glad they changed the design. I had just damaged the coil jack on one of my old model Alleva-Waves. I think with the plug in the jack so exposed like that, I must have wrenched it in my pocket. Notice on the new Alleva-Wave that there is a collar which supports the plug while in the jack. This should make it much more durable. (In any case, I was able to send my old Alleva-Wave back for repair for $120).
Somapulses come with a case which protects it somewhat. Unfortunately, there is not one included with either Alleva-Wave although this is part of the reason for its lower price. I would recommend one in any case. Visiting the local camera store, I found that the Lowepro Santiago 20 case is awesome for it. The case is stiff so it gives some hard protection for it. There is belt loop so that you can hang it on your belt; much more useful than shoulder strap loops.
It’s got a battery cover now, although with the lithium 9Vs I got off Amazon, they are a VERY snug fit. They fit better now, because I’ve rubbed off a layer of label which made them thicker than the normal 9V battery out there.
Another nice feature is the on/off switch. The Somapulse had an off position, but lost it with the old Alleva-Wave to insert a more powerful X setting which is 35% more powerful than the H position.
Still, all this power isn’t really required – they recommend using lower settings for more effectiveness. I’ve also tested this and found this to be true.
Most recently, I’ve been having problems with my left biceps tendon. I was using the H setting on my Alleva-Wave but it didn’t seem to lessen the soreness any. Two days back I flipped it down to M and then the soreness lessened greatly. Go figure.
They do recommend starting at a lower setting and moving up from there. X has never shown as much improvement as H, and now I’m finding that for my biceps tendon M is setting to use. I guess each of us responds uniquely to the PEMF, and it depends on where on the body we’re talking about. Remember also that the Alleva-Wave is for veterinarian use, and so the higher power setting may be required for large animals in order to penetrate tissues deep enough.
Some other interesting things I’m trying out:
1. Thyroid stimulation – 30 minutes a day, in the morning so that it is optimal for time of day. Stacked coils, level H.
2. Testosterone stimulation – 30 minutes a day, usually in the morning – no particular reason except that I put the coils between in my legs “down there” while I’m driving in the morning. Convenient time to be using it there without others wondering what the hell you’re doing!
All in all, I am still happy to have discovered PEMF for treating these issues. Otherwise, it seems like it takes forever for things to heal now and am very glad that I can cut that time down a considerable amount, and get back to the training I love.

ARPWave Search and Destroy for Left Shoulder Part II

After I finished Search and Destroy on my left knee, I started working on left shoulder.
My left shoulder has been plagued with soreness in the pec minor area. The pec minor feels always tight and sore, and I can feel it pull my shoulder forward and out of position. This results in compensations in which muscles activate whenever I swim or do pull-ups and I get sore there. In my search for a solution, I decided to turn ARPWave therapy on it to see what would come out.
I setup the machine and started the Search protocol all around my left shoulder. I used an electrode and scanned my left shoulder, my left chest, my left shoulder blade, and also down the left arm. I didn’t find any hotspots except down my arm where I found a problematic medial head of the tricep, and on the bottom edge of the upper forearm.
These two hotspots were pretty “hot” – they caused my ring finger and pinky to contract strongly and convulsely without my control. My hand turned into a claw! There was no way to straighten them out and I could feel the power buzzing all around the electrode in my muscles. In many ways, I was not looking forward to this!
After the Search phase, I put stim pads on my hotspots and prepared for Destroy. The movement was 5 wide grip pull up motions, and then 5 freestyle strokes on each side, and the total time was 7 minutes. I then turned on the ARP Trainer and turned it up as high as I could take it. My left hand immediately turned into a claw and I turned it into a fist to stop it from hurting. Then I did the movements, first pull up movements and then swimming with firsts instead of open hands. It was extremely difficult as the stim power tried to prevent my arms from extending. I did 5 of each, then tried to turn the power higher. The contractions got stronger and my hands were harder to control. I did 5 more of each movement and then turned up the power more, and repeated until 7 minutes were up. By the end of 7 minutes, the power was causing my hands to move of their own volition! It was very disconcerting – my ARP therapist reassured me that no one ever got hurt doing this, even if my hand was moving around like it was possessed and was cracking as it moved!
After turning off the power, my fingers and hand were still buzzing from the strength and high frequency of the electricity. I couldn’t yet move my fingers yet, and they seemed to wiggle on their own.
As soon as they calmed down, I downed 37g of protein (to match the 37g I took before the session) to prevent undue soreness from the treatment.
This continued for 7 sessions at which time I plateaued on power. With these muscles, I was struggling to reach max power which came a lot easier with my bigger leg muscles. Increases came in inches so we decided to move on to the strengthening phase.
For this strengthening phase, I mirrored the pad placements on my left arm on my right arm. I would use a move called the Statue of Liberty. It involves holding a light 1lb dumbbell, and placing it across my waist with thumb turned down, and then raising it across the body while turning my thumb upright to the finish overhead position, as if I were holding the torch like the Statue of Liberty. I would do 1 min with the left hand, then 1 min with the right hand. After this, I would attempt to increase power, and then repeat the Statue of Liberty on both hands. This would go on for 5 intervals for 10 minutes of work, with power increases in between.
The first session was incredibly tough. My left arm was already adapted somewhat to the stim, but my right arm was first encountering it. So while it was relatively easy for my left arm to the do the movement, the right arm was having a ton of trouble as it caught up with the power of the stim. I strengthened for 11 sessions and by the end I reached max power. But it would a tough ride. There were a few times where my right hand was stimmed so hard that I could not even hold onto the dumbbell. I would drop it and then my right hand would turn into an uncontrollable claw! I would then quickly turn off the power and stop for the day.
The test at the end of this therapy was either to swim 10 lengths at 50%, 75% and 100% effort or to do 10 pull ups at 50%, 75%, and 100% load as fast as possible. I did the swim test and there were no issues, only that my endurance was severely lacking and keeping up at the end was tough.
I am unfortunately not optimistic with pull ups. A few tests with a band to assist still left me with a little bit of soreness. So something else must be wrong or missing.
What I learned:
1. A proper mindset is required to able to achieve high power at high frequencies. You must relax and let the energy course through your muscles. To react to it will cause instant seizing up of the muscles for sure, which is not what you want and VERY uncomfortable. It is better to think of it as an irritant and relax into it. That is the first phase.
The second phase is, in order to achieve movement in the presence of the powerful stim, you can’t force the movement. Compensations will occur as will contractions that will resist the movement. Instead, try to send the mental command strongly to move the limb and I think you will find that the limb will move.
2. If you are training with the POV, Search and Destroy can help you adapt faster and reach POV max power. This happened on my VMOs which were, before S&D, very resistant to high power. Now I can turn up the machine to max power on the VMOs every time.
In seeing the differences between S&D and POV training, I spent a focused time with the ARP Trainer on one thing. I find that my POV programs don’t allow me to spend enough time often enough to get to adaptation faster. I am wondering what would happen if I took each of my protocols and just did them nearly every day – wouldn’t I adapt faster and get to max power quicker?
3. I think that the therapy, while it does create benefits, is not a total cure just because you did it. You still have to pay attention to proper positioning and imprint proper movement. If you fall back into poor movement patterns, the problems will come back. In the case of my shoulder, I was still feeling soreness if I did particular movements. On the other hand, I do not think we properly duplicated the stress and movement pattern of the pullup to really have addressed the pullup issue. Doing air pull ups really didn’t have the same effect on muscles and the CNS as hanging from a bar and pulling upward.
I am working on imprinting the proper movement patterns so that the soreness won’t come back. However, in working on the tricep and forearm, now they are turning on whereas before they were not functioning correctly.
4. Again, I think that if you do ARP therapy, you should live with a machine for an extended period of time. Going once or twice isn’t a guarantee of a longer cure for problems. Make sure that the movement patterns you use during treatment closely mimic the movement pattern(s) that give you problems. Use perfect movement when you do the movements. Execute them flawlessly. This may require a good coach or movement specialist to watch you VERY carefully and correct you.

Dynamic Neuromuscular Stabilization: Awesome!

This last weekend I spent 4 days learning the basics of Dynamic Neuromuscular Stabilization, or DNS. It was a fantastic 4 days and not only did I learn the basic techniques, but also got to see a group of experienced PTs in action using methods I had not seen before, and giving out information in ways I had not heard before.
DNS was developed at the Prague School for Rehabilitation by Professor Pavel Kolar through watching how newborns develop their stabilization and movement skills, from lying down to finally figuring out how to stand up. The techniques are based on the stages the child goes through and they are named as such like 3 months, 4.5 months, etc. They have shown that most people, if they have gone through proper development when they were babies, still have this basic movement capability burned into their nervous systems. It’s just that over the years after childhood, we have either forgotten or muddied up those beautiful movement patterns from our childhood. The techniques enable us to bring back those good movement patterns and help re-burn them into our current nervous system. Watch the videos on the Prague School site for more detailed information.
There are many classes to take. I took DNS Exercise Level 1 and 2, which is more for fitness professionals. Clinicians take another set of DNS classes. We went through a whole set of assessment positions, which can be also used for treatment as well.
Some of the really interesting things I learned:
1. There was the best discussion I’ve heard yet about Intra-Abdominal Pressure (IAP), how to test for it and then how to generate it. Then everything follows from there. Their view is that without IAP, then everything else cannot happen: movement, lifting, walking, etc.
In the fitness world today, we hear a lot about “bracing” before doing a lift. After learning about IAP, I think we need to change the word “bracing” because I think it evokes too much of the wrong thing, which is activating core muscles that can stabilize the torso, BUT you can’t breathe because you’ve squeezed the wrong ones. If you stabilize correctly with IAP, you will also be able to breathe.
2. In order for healthy movement to exist, there must be proper co-activation of opposing muscle groups. In any movement, there are agonists, or muscles that are providing the major force to create movement, and there are antagonists, which are muscles that oppose the agonist.
As an example, in the case of a bicep curl, the agonist is the bicep which concentrically contracts (shortens as it contracts) to flex the lower arm up to the upper arm. The antagonist is the tricep, which must eccentrically contract (lengthens as it contracts), to let the bicep move the lower arm up to the upper arm. If either one doesn’t do whatever supposed to do in perfect timing, then problems can occur like compensatory actions (using other muscles that shouldn’t normally be used) and can lead to injury. Imagine if your hamstrings are very tight, and then you swing your straight leg forward up – the hip flexors raise the leg up but if the hamstrings are so tight and can’t eccentrically contract fast enough, you could pull them as you whip your leg up. So proper function is that over your entire body, your muscles are co-activating as agonists and antagonists in balanced way with proper timing, and can both concentrically and eccentrically contract at will.
DNS contains techniques to help fix issues in co-activation. Here is a shot of one of their PTs working on my left shoulder, which I’ve been trying to fix for a while now.

My left shoulder has a tendency to drift forward and my pec/pec minor feels always tight. It gets sore when I swim, and sometimes really acts up during pull ups. In the pic, she is using one of the DNS positions and encouraging the eccentric contraction of my external rotators, while setting my shoulder in the correct position.
The moment I got out of that position, my shoulder felt great! Wow!
3. The spine must be properly aligned, from pelvis to the top of the head. The moment you break from proper alignment, compensations start popping up and inefficient movement occurs. All of the DNS moves involve setting the spine in as perfect alignment as possible, and then a movement is performed where we encourage the person to not break from spinal alignment, and to learn how to maintain spinal alignment in non-static situations.
4. Joints must be centrated in order to perform proper movement, support maximal loads, and protects structures. Decentrated joints cause problems! So the upper arm must be in the proper location in the socket to move efficiently and safely, as does the head of the upper leg bone must be in the proper place in the hip socket.
We went over how to centrate joints properly and how to observe the body for signs that joints are not centrated.
It was amusing to see how these PTs would get right up on you, using their whole body to hold you in place as you performed movements, holding your spine in position and your joints in centration! But it was necessary – it’s the only way the person can feel the proper position of the body as you go through the movements. The PT would first align and centrate you in static position, then hold you in position with their entire body and lead you through movement to the end position of a DNS developmental position.
After taking the class, my mind was filled with new ideas and possibilities. I contacted another DNS certified trainer to run me personally through all the DNS positions, checking me and making sure I am holding proper position in each one. I figure if I am to use DNS on someone, I may have to demonstrate and if so, it better be as close to perfect as I can get it!
I am also looking forward to applying DNS IAP development on some of my swimmers. Without IAP, it is impossible to efficiently transfer energy from the kick through to the spear of a stroke; you have energy leakage all along the way. But with IAP, you will be able to have a great base to transfer energy as well as make great swimming movements in the water.

MobilityWOD Quick Start Guide

I discovered MobilityWOD (MWOD) last year and love the content they put up. It has really opened my eyes on my own problems and limitations, for which I never really had good solutions for – but now I do. My education on anatomy and proper movement and mobility has gone way up as a result of their presentation of the material – previously it seemed like you had to be some health professional to understand what was going on. All these big words and concepts – nothing ever stuck until now.
Becoming a Supple Leopard by Kelly Starrett of MWOD is an amazing book. His site is an extension of the book, kept up to date in real time with developments from him and his staff. While the content came out of Crossfit circles, it is relevant to any athletic activity.
In the forums, I posted this entry on how to start with MWOD. Despite the approachable nature of the material (formerly unapproachable in big medical and scientific terms), it is still a lot to take in. So here is my short cut (with minor edits from the forum post) to getting started with MWOD and how to diagnose and fix your particular problems:
I can feel for you. When I started going through the material, it was daunting. In fact, it still is as more gets added each day. And then, as my PT likes to tell me, year over year the philosophies can change (like Kstarr’s stance on icing, where it’s promoted in his early videos and not in his later ones). But yet those videos are still up! Dang it!
Here’s my suggestion for a template on shortening the process:
1. Get Becoming A Supple Leopard (BSL). Watch some of the early MWOD videos, Episode 1 and 2.
2. I would definitely spring for at least a month of PRO access to watch the webinars. They also give you a sense for the problem areas on most athletes. Once your understanding increases, your ability to address problems increase.
I would also highly recommend subscribing monthly to PRO. The videos there are updated daily in DailyRx, and there is always something new I learn, some little detail I missed the last time through.
3. I would then go into BSL and read the early chapters 1,2,3,4. Pay attention to the various tests there, like deep squat and evaluating external and internal rotation at the shoulders and hips. Try some of those. Are there any that you cannot do? If so, then work on that. That can give you a start on identifying which areas can be improved, even if you have no visible problems now.
4. Get a lacrosse ball, Battlestar Big and Little, Supernova, Gemini, Voodoo bands, Rogue Fitness bands green and black, Yoga Tune Up Alpha Ball and Therapy Balls (Yes this can set you back a lot of cash but it IS WORTH IT). Use these in your mobs (short for mobilizations) to work on those areas you want to improve.
Select a test like a deep squat that you want to improve. Use mobs for the relevant areas. After each mob, get up and test the squat again. If improved, remember this mob for future work. Keep going to next mob. stop, get up and test again, etc. etc. It can take days/weeks to achieve the full ROM in a given test or it might take an hour.
5. You can also use mobs to see if you need to work on an area. I often go down into banded distraction hip openers, only to find that I don’t have any significant corners to release. So i don’t hold those for 2 minutes but quickly move to the next mob.
6. Are you into a certain sport? There are videos that pertain to certain sports. that can also speed up the process by getting you to focus on a given area(s).
Yes there is a lot. i would slowly work into it. it’s all very interesting when you start digging in. and yes it is kinda overwhelming in the beginning.
If you live near a good MWOD trained PT or movement specialist, they can show you what a process looks like live. I did some sessions with Roop Sihota and it was awesome watching how he evaluates and goes through the process. I also video the session so i can go back and review later.

I loved the MWOD process so much that I went (and suffered through) a Crossfit Level 1 Trainer course, and am heading for the Movement and Mobility Prep Course, taught by MWOD staff.

ARPWave Search and Destroy for Knee Tweak Part I

About 3 weeks back, I tweaked my left knee. I was practicing some medicine ball cleans after I took a Crossfit Level 1 Trainer weekend seminar and on one of rise ups from the clean, my left knee must have drifted inward and I got a twinge of pain on the outside of the knee. I was hoping it would go away, but it didn’t. It lingered and was making my leg not feel correct.
I then remembered reading about how therapists were using the ARPwave electrostim machines to help people heal faster from knee injuries. I had already tried out their Search & Destroy (S&D). But going for only a session or two on a given problem didn’t give me longevity on the solution. The problem seemed to get better for a while and then it came back.
Also since I train with an ARPwave POV, we often talk about how to reinforce a training state for a long period of time. If an athlete can get to max power on the ARPwave POV and complete 40 sessions at this power with no compensation, they can maintain this heightened training state for as long as a sports season, maybe longer.
With this in mind, I thought back to the fact that my previous S&D sessions seemed to provide a solution to the physical problems I had, but it was short lived. I also thought to the fact that some people will rent one of their therapeutic machines, the RX100 or Trainer, and live with it for many weeks. Putting two and two together, I figured that if I were to rent a machine and use it nearly every day for many days until the problem was solved, then I could get more completeness in the treatment and longevity in the results.
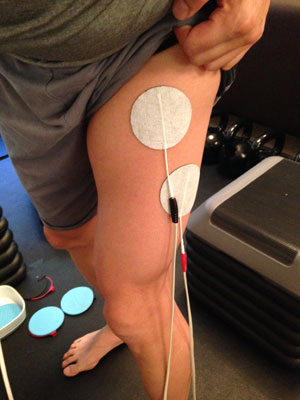
I rented a Trainer from ARPwave Austin. Via a Skype video call, they led me through In-Balance technique (mimicking a technique that chiropractors do with physical manipulation), then S&D on the left leg. S&D found some “hotspots” on the top of my rectus femoris, and along my vastus lateralis, and another lesser “hot” spot on my vastus medialis (VMO). Choosing the two hotter spots, I put stim pads on them:

Now came the fun part. My movement was to squat 5 times, and then increase power, over a period of 5 minutes on one polarity and then repeat with reverse polarity. At maximum frequency of 500 pulses per second (PPS), my muscles quickly contracted into big knots as I increased power! When I reached my current tolerance, I would then perform 5 squats. Adaptation (amazingly) occurs within the 5 squats, and now it doesn’t feel so bad any more. I crank the power again and once again my leg muscles seize up. Then I force my way through 5 squats, finding that it gets easier with each rep. I adapt once again! I crank the power again, grimacing at the new higher level. I repeat the squat reps, and adding power in between sets.
I should also say I learned my lesson from my first times with S&D – if you don’t eat enough, you’ll be horribly sore for days after. So now whenever I do S&D, I drink a protein drink of about 37g of protein (2 scoops BCAAs 10g, 3 scoops Muscle Synthesis 22g, 2 Tbsp Upgraded Collagen) before and after the S&D. Then I also try to eat .75lb – 1lb of beef or lamb in the meals following. By doing this, I manage to stay soreness-free and am able to be recovered enough to do S&D the next day.
I did this on as many days as possible following. There were definitely days off in between, but I tried to do it every day. Each day, I managed to reach max power a little earlier until I could just put it up to max power on the first try. The rectus femoris hotspot disappeared very quickly, and I switched to working the VMO instead.
My VMOs deserve some further discussion. The first inkling I had there was trouble with them was running the NYC Marathon and then the LA Marathon. In both times, I was pushing hard but miles before the finish, my right VMO cramped out on me. Then, during training with EVOultrafit and my POV, I always found that my VMOs, if they were part of an electrostim pad placement, limited my ability to take high power. As soon as I reached a certain level, they would seize up and prevent me from moving.
It turns out that as a training tool, the POV tries to get your muscles to be used to firing at a higher rate and with stronger contractions, thereby allowing it to perform at a higher level.
I was not surprised that a hotspot was also found on the left VMO, and so after my rectus femurs hotspot disappeared, I switched to working on my VMO. Sure enough it seized up, but going through the S&D protocol, I was able to more quickly increase power and adaptation to high rates of contraction and contraction strength.
After reaching max power on the ARP Trainer on the first interval of movements, I moved onto the strengthening phase.
This involved putting the pads on both sides of my body, first putting them on the original hotspots on the left leg, and then mirroring them on the right leg. So now, I was going to hit up my right VMO but without having the benefit of going through some days of Trainer work on it. As soon as I powered up my first strengthening phase, I marveled at the difference in feeling between my left VMO, which was just sitting there taking the power, and my right VMO, which had seized up but was adapting quickly.
Strengthening involved three movements:
1. Stomp Squat – you are sitting, then stomp both feet on the ground to shoot yourself to standing.
2. Isometric Hamstring Curls – you are sitting, then try to pull your feet into the ground via your hamstrings as well as curl the heels back.
I did 1 and 2 alternating for about 10 minutes. In between each pair of movements, I would attempt to increase power a little more until I was at maxa power. After the 10 minutes, I would jump into:
3. Standing Leg Extensions – stand on one leg, bring other leg up to horizontal. Kick out foot, pause for 1 count, then bring back. Repeat on both sides.
This I did for 5 minutes. Once again, I was supposed to increase power, but by this time I had already adapted to max power and just did these straight through.
I did strengthening until I could achieve max power on the first interval. The limiting factor was my right VMO which had to come up the adaptation curve.
The last piece was a sprint test, to make sure there was no more pain at all. I was to run sprints, 10 at 50% effort, 10 at 75% effort, and then 10 at 100% effort. If there was any pain of about 2 out of 10 or above, I was to stop and keep going at strengthening.
So I got on my old running shoes, not looking forward to this as I had not run at all since 2012! I managed to get up to 100% for 6 reps, at which time my right groin was getting super tight. Not wanting to risk a groin pull, I stopped (and also because my times were starting to rise and I could not keep up 100% effort). It was, however, good enough evidence that the process was completed and that I could be back in action.
My thinking now is that while some issues can be resolved with only one session of S&D, there are some issues that require more regular time with the protocol. It was definitely worth it to rent the machine first to address my left knee tweak, and then get my VMOs to a higher level of performance.
I am really curious, however, on whether or not my right VMO will cramp out again during a marathon. This will have to wait – too busy to train for such a long event, and I hope I can maintain its level of performance until I get time to train again.
Now that I had this ARP Trainer here, I decided to keep it for a few more weeks and address another nagging problem: my left shoulder which gets sore during wide grip pullups and swimming. Stay tuned for part II.

UPDATED: Somapulse/Alleva-Wave: Healing and Recovery via Pulsed Electro-Magnetic Fields

The latest gadget I’ve been using is the Somapulse. It uses Pulsed Electromagnetic Field technology (PEMF) developed at NASA, and its patented signal helps humans repair and heal tissues. You can read more about the development of the Somapulse on their site.
As an athlete, I have an immediate attraction to any technology that can heal me and help me recover faster! Still, I had to admit I was skeptical on its efficacy. I had tried a number of recovery technologies and not all of them seemed to work. But if something was good enough for NASA, it must be good enough for me, right?
The Somapulse retails for $1390 but I had a discount code which reduced that to about $1000. It’s design is pretty ghetto – for $1000 you’d think they could make a battery cover for it. It runs in cycles of 40 minutes: 30 minutes of looping through 3 different types of signals, and then 10 minutes of rest.
The first day I put it on for about two cycles on my left front deltoid area, which was sore from doing pull ups (poorly!). By the time the two cycles were done, the soreness was gone! The next morning there was still no soreness.
Next I tried it on my forearms and elbows, which were completely wiped out from bad kettlebell form. The problem had moved from being muscular to inside the joint itself. In weeks past, I would take a week off from working out and the pain/soreness would not even diminish. By the end of the week, it felt pretty much the same as it did when I began the week off. Then I would go on to workout and more than likely destroy it further.
It seems that my recovery capabilities are pretty slow now as I get older. If the Somapulse doesn’t work, then my only alternative is to take a LOT of time off until my elbow and forearms heal up. That would suck!
After 3 days of Somapulse treatment for many hours each day, the pain was noticeably less! By 3 weeks time, the elbow was pretty much completely healed! Amazing!
I loved this device so much that now I have 2 of them, and then I bought two more of their “veterinarian” version called Alleva-Wave. It is only $700, or $550 in quantities of 5 or more (to get the discount you must join on their site). With 4, now I can treat all 4 limbs at once (yeah I got a lot of problems!). The Alleva-Wave also supposedly has some improvements in the PEMF is gives out. I’m testing it now.
Some usage notes:
1. Putting on the Somapulse right after an injury, or some place you think you’ll be sore, is more effective than the day after. I have this issue with electrostim training on my VMOs and they always get DOMS for many days after. If I train, and immediately put on the Somapulse coils, they will not be sore – DOMS doesn’t even show up. But if I wait even a day, the DOMS appears and stays no matter how long I put the coils on.
2. Muscular issues take a lot less time than ligaments or tendons. So my left front delt issue could be cleared up in an hour, but my elbow took 3 weeks of treatment every day for many hours.
3. I find that wearing it for many hours each day is best, for as long as you can take having wires hanging around you.
4. Stacking the coils to magnify the electromagnetic field to the max is best. I tried separating the coils and sandwiching areas but none of these seem as effective as stacking the coils on some area.
5. They sell coils with varying cable lengths. I found that the longest ones are the best 47″. The other two are way too short and inconvenient.
6. Most of the time, using a velcro wrap works well in holding the coils against a body part. But some parts are much tougher, like the shoulder area where movement can cause a wrap to shift and the coils may either move or fall out. I wear Under Armour Compression Shirts which work really well at holding the coils onto awkward parts of the body.
7. Wearing cargo pants is a must. Big pockets are necessary to hold the Somapulse or Alleva-Wave units.
8. Rechargeable lithium 9V batteries are also a must. Buy some of these off amazon.
9. There are some more interesting effects I have not tried yet, like stimulating the thymus for the immune system or solar plexus for systemic issues. The possibilities are pretty cool though.
I really was skeptical that the Somapulse would work. I was pleasantly surprised at its effectiveness. This product rates amongst the best I’ve spent money on.
UPDATED:
Yesterday I was waiting to see how long it would take for some DOMS that showed up on my right VMO because of electrostim training. It was day 3 and it was still very sore; I was skeptical that it would disappear by the next day on its own. So I put my new Alleva-Waves on to see what would happen. Knowing what happened with the Somapulse, I was expecting that nothing would happen. After several hours of treatment, my soreness didn’t diminish and I went to sleep.
This morning I woke up and the DOMS in my right VMO was nearly gone! Wow! During breakfast, I put the Alleva-Wave on it for another 3 hours and after that, I was ready to hit it with electrostim again.
Something in Alleva-Wave’s setup makes it more effective than the Somapulse. I stacked the coils on the right VMO, and used the H setting. It may be that because there is now no rest period that and there is also higher power now. But I am ecstatic that I can get rid of DOMS overnight whereas before I could not with the Somapulse!

Eating for Recovery

A while back when I was still racing Ironman, I figured out that taking protein powder mixed in sports drink for the days after my long training day could bring in recovery by one whole day. Still, my recovery was up to 3 days after, meaning it was really tough to do a decent workout until 2-3 days after that long day of swimming 4000m, biking 6 hours, and then running 30 min. I was elated to discover that protein powder could accelerate recovery by a whole day, but I just chalked the slowness of recovery to my age.
Little did I know….
Fast forward to today. Over the last seven months, I’ve been doing dual kettlebell and EVO/POV workouts (EVOultrafit training with an ARPWave POV electrostim machine). Since both were completely new training stimuli to my body, I knew there would have to be some fine tuning on how much I could do. For many months, I tried to figure out how to be ready and train for as many workouts as possible in a week. For kettlebells, I was building muscle and strength to handle heavy weights in a ballistic manner; for EVO/POV training, I was using a ton of resources through neurological training.
I tried varying the number of workouts per week and also what workouts I was doing each day. I tried EVO first and then KBs, but that made me too tired for a good (and safe) KB workout. So I ended up with KBs first and the EVO/POV next. But still, I would wake up the next day sore from yesterday’s workout. This wasn’t good – I felt like I couldn’t put enough time into training technique for KBs each week. I tried doing 2 days of KB/EVO workouts one after another but sometimes that would wipe me out for 2 days straight! At this point I ended up doing 1 day of KBs/EVO-POV and 1 day off.
The EVO guys told me that I should be eating 1g of protein per pound of body weight to enable good recovery. I started doing some calculations on how much I was eating and I was coming up short! So I upped my protein intake to about 150g (I weigh about 150 lbs), and started taking protein powder before and after my workout to help with recovery. Still, while eating this much, I was not recovering overnight but needing an extra day or two.
About a week ago, I decided on a whim to eat more. Every day I started eating one meal where I would eat a pound of beef. I also added more protein powder across the day. What a difference that made! One the first day I did this, and did a KB/EVO-POV workout that day, the next morning I was completely not sore but only tight in a few places, which I addressed during warmup! Amazing! I went back to my notes and did a calculation on protein intake and I was up well over 200g of protein! Apparently the rule of 1g per 1 lb body weight wasn’t right for me!
I asked Garrett Salpeter of ARPWave Austin what his experience with eating was and he said that in many instances, the ratio was more like 1.5g to 2.0g per lb of body weight, sometimes even more, depending on the circumstances and how heavy they were training.
It seems to me that the 1g protein per pound body weight is a good starting guideline and that you have to experiment to get the correct ratio, sometimes upwards of 1.5 to 2g or more protein per pound body weight! You try 1g/lb first and see if you recover by the next morning; if not, eat more!
Looking back to my Ironman training days, I was clearly not eating enough to fuel recovery. Potentially it was also a reason why I was healing so slowly too. Yes, age is a factor but when I am burning through resources through heavy training, there may be not enough left for other things. But age clearly isn’t as much a factor as I thought as after eating a ton more, I could recover from a tough workout overnight!
Other related items to note – having regular stool is a sign that my body is processing food and expelling waste well. Not having regular stool is a sign that something isn’t working right. This was another sign that something was amiss but I did not know how to read it, as I was not having regular stools for years! However, to fix this, it took Dr. Justin Marchegiani of JustInHealth. I did a series of blood tests: adrenals, thyroid, iron, cholesterol – to see what was wrong with me that I could not see through non-chemical means. The test result that was problematic was my ferritin; it was off the charts! As Dr. Justin put it, I was rusting from the inside out!
I took some supplements to help absorb iron and also stopped taking an iron supplement plus the multivitamin with iron in it. Then I gave blood which was the fastest way to remove iron from your system. After my first blood donation, magically my stool became regular! A month later, I gave blood again and my stool became not only more regular, but more than once a day. This showed that my digestive system had come back to better and proper function and somehow the excess iron was causing this problem. Doing some detective work like this on my blood composition was definitely helpful in putting me back on track.
One more comment – eating more is a training effort in itself. I had to adapt to stuffing myself with more food every day. I am not sure about reports about the stomach needing to stretch but it did take a day or two to get used to eating this much food. But now that my digestion was back on track, and the fact that my training uses up so many resources, I find that eating so much isn’t so bad and that my processing of the food is fast and good.