You’ll find all the original posts here, but please see my new blog at CoachDShen.com!
This blog has moved to CoachDShen.com!
Leave a reply
You’ll find all the original posts here, but please see my new blog at CoachDShen.com!
About a year ago, I tried intermittent fasting (IF). I was disappointed that I didn’t get any results, with no change in body composition after 2 weeks. I noted some things that could have improved the results – it seems that IF is pretty sensitive to a lot of things in order to really get benefits.
Just recently I got turned on to Carbo Back Loading (CBL) by John Kiefer. Despite the overwhelming marketing on his site, I actually found his method to work for me. The process is pretty simple, even though his book is 290+ pages long. You basically just only eat carbs towards the end of the day, and move the workout to right before dinner time.
I had already added carbs back into my diet as I was wondering if my thyroid issues were the result of being on a low/no-carb diet for the last 4-5 years. The low/no-carb diet worked wonders for my fat composition, but other things seemed not quite right. I also didn’t seem to be gaining any muscle but I also found evidence that I needed carbs to make my muscles grow.
So I began adding carbs back, but I found that I was gaining weight, up from about 156 lbs to 168-169 lbs! My waistline wasn’t looking trim – my Omron said I was up to 25% body fat now. And by the way, my thyroid numbers didn’t get better by carb intake which was disappointing, so I fixed that via supplements prescribed by my functional medicine doctor, Dr. Justin Marchegiani.
At this point, I was working out mid-morning. I would take Infinity Fitness’s 100% MR and Muscle Synthesis before and after workout, and then started eating carbs at lunch time to refuel as if I did not, I would often get into a low energy state by mid-afternoon. Taking carbs in right after working out seemed crucial, although it seemed that this was also making me gain a lot of fat. So carbs seemed essential for recovery from a tough workout, but it was making me fat too.
Enter CBL. There is a ton of theory that I’m working my way through now in Kiefer’s book. But implementing it is relatively simple.
I moved my workout to around 4pm every day instead of about 10am. I then only ate carbs after working out, and only at dinner time. During this time, I would have breakfast consisting of whey protein, eggs, and Bulletproof coffee with grass fed butter. At lunch, I would eat about .5 lb of beef on days I worked out – if I didn’t workout, I would just healthy but not necessarily meat to keep some variety in my diet. At dinner after workouts, I would have another .5 lb of beef, and on non-workout days just vary it up with something healthy again.
Note: I try to eat 1x my body weight in grams of protein per day for recovery and for growth. There were times when I could only recover with 1.25-1.5x my body weight. So weighing about 165 lbs, I try to eat 165g of protein. In beef, there is about 6g or protein per oz of beef. One pound = 16 oz = 96g of protein. I can then make up the other 65g or so with protein powder supplementation and other foods.
I did this for 2-3 weeks and found that not much was moving in my body composition. What the heck was wrong with this? If you read the book, Kiefer claims you can eat whatever you want including crap at night. Not sure if I would ever do that, or even buy into that. But still, if someone can eat crap and still lose fat, then why was I not losing any?
Side note: Dr. Kathy Dooley, a coach therapist based in NYC, was the one who turned me onto CBL. In my conversations with her, she told me that CBL works with some people and not so well with others. I find that consistent with my own observations and readings on diet; some diets work great with you and some don’t work so well or not at all. There definitely seems to be some differences between humans in their responses to food intake and how they process it. How do you tell what works and what doesn’t? I think the best way is to try some for a while and see what gives you the best results AND is sustainable by you, given your mental make-up (ie. how good is your willpower and focus?) and your lifestyle (ie. traveling often for work sucks for eating right).
So just a week ago, I decided to add IF back into the equation. I started skipping breakfast and only drinking some Bulletproof Coffee, and only consuming food during an 8 hour period between 12noon and 8pm. This is recommended by Kiefer, which is to simply skip breakfast.
At the same time, I was wondering about my ultra-high cholesterol numbers and Dr. Justin mentioned yet again that he has seen cholesterol go up when people start drinking Bulletproof Coffee with butter in it. So I started drinking Bulletproof Coffee without butter, but with only Brain Octane to give my brain a boost and MCT Oil which will give me energy benefits as fat but doesn’t get stored in my body in fat cells.
Just this week, I measured myself now at 164 lbs and 24% body fat (down from 168 lbs and 25% body fat). Wow! Now things were working better!
However, the fact that I lost about 4 lbs and barely moved in fat % worried me. Was I going catabolic during the morning when I didn’t eat? I then added in 10g of 100% MR in the morning which are BCAAs to help me maintain muscle during fasting periods. The results were pretty good. Now I’m at 164 lbs and 22% body fat. So body fat dropped while weight stayed the same. Pretty cool.
Note: The 100% MR I take is their new product that is Stevia sweetened. I believe this was the missing element during my first experiment with IF that cratered my results. Their old product was sweetened by sucralose which in many ways is worse than sugar! When I worked out mid-morning and bracketed my workouts with sucralose sweetened protein powders, my belief is that this messed up my ketosis big time and made IF produce no results. Stevia however seems to not interfere with ketosis. I have ordered all new Stevia flavored versions of the protein powder, both 100% MR and their new Muscle Synthesis. Can’t wait to go through my final sucralose flavored tubs of those two. Thankfully it seems that taking in sucralose during my non-fasting period seems to be OK from a fat loss perspective.
It’s pretty interesting to see my progress. Definitely there is a lot of tweaking here and there. You also have to pay attention to labels and what you’re putting in your mouth. Any little unknown deviation could stop your results cold, as I found out. I’ve also started taking Omega-3s when I eat a take out meal or eat out. So many restaurants use crappy oils for cooking; it’s a good idea to balance out the Omega-6/Omega-3 ratio somewhat if you are eating food cooked by a restaurant.
One of the biggest issues I see first with my swimming clients is their posture. When they cannot get their spine aligned properly, nearly everything about swimming is very difficult.
We start with balance in the water, but if you cannot get truly horizontal in the water, then balance is hard to achieve. Most of my clients are Silicon Valley professionals – hence, a desk job at a computer for years, if not decades, with their upper (thoracic) spine and neck both dropping down, and their shoulders pulling inwards towards their chests as they look down on monitors and type on keyboards. When your posture is like that, and for many years, your body and mind think that is normal posture. All your structures and muscles have (mall)adapted to this shape. Then, one day, you want to start an athletic endeavor (great!) but unfortunately your posture is now not in an optimal shape for movement.
What does poor posture, and therefore, poor spinal alignment, produce? The body is an amazing machine. It has mechanoreceptors (nerves which sense mechanical pressure or movement) which will fire the right muscles to do what the brain is telling it to do. If you want to move or lift or whatever, and your spine is aligned, then the correct muscles will fire to perform the movement. Primary movers, big muscles like your pectorals and lats, that are designed to move your body parts fire and do the main work. Stabilizers, smaller muscles whose main function are to keep your body parts in alignment during movement, fire to keep the body structures stable so that primary movers can do the heavy work.
When the spine is not aligned, your body will do its best to enable it to perform whatever instructions your brain gives it. But knowing that your spine is not properly aligned, it will begin to fire the wrong muscles, meaning stabilizers or the wrong primary movers, in order to perform the movement. Stabilizers are great at one thing; they are designed by nature to keep the body in alignment – they are not great at creating power for large movements over long periods of time. They are smaller, and they do not have the proper mechanical leverage due to their location on the body which is not like primary movers which are placed in the right locations and attached to create huge mechanical advantages for movement. Consider the list from the Postural Restoration Institute in the document entitled Swimmer Dyssynchrony Syndrome. Muscles perform duties they were not designed to do, leading to poor swimming and injury.
Not only do muscles perform the correct functions, but also things like balance in the water get hard to accomplish. Trying to press the front part of your body down into the water becomes nearly impossible when your upper spine is frozen in a curled position. Nor is holding your body truly straight possible – so the lower part of your body wants to bend downward and trying to straighten resists muscles and structures that won’t or can’t get there.
Fixing posture then becomes a critical part of swimming well.
Sometimes, posture can be addressed by practicing activity. For example, some coaches have told me that continuous, diligent practice with Superman Glide can often aid in postural correction enough to improve balance.
Humans were designed for movement. It is the lack of movement that is creating problems in our postures. So sometimes getting people moving again and doing something other than sitting is enough. Other times it is not. Or, if someone wishes to speed up the process, then other interventions are possible and desirable.
There are many resources to address posture. I recently took the Gokhale Method which was excellent. Its methods are very much suited for the non-athletic population and think they are great for both athletes and non-athletes.
Another great resource is Foundation Training. Their therapy involves a bit more exercise and movement. However, there are some excellent exercises to help you tone up muscles and your nervous system to hold your body’s shape during movement. You can look at their DVD or find a resource who is trained in their methods on their website.
If there is anything I’ve discovered about swimming, it’s that swim training doesn’t have to take place only in the pool. There is a lot you can do out of the pool. A lot of postural correction and training can and needs to take place out of the pool. It can be like Gokhale Method where the practice does not resemble traditional exercise, or it can involve practice like more traditional exercise, like the movements described more fully in Foundation Training. Working on spinal alignment and reawakening muscles that support proper spinal alignment is a 24/7 activity.
In summary, postural improvement is an important part of swimming. Corrections to your posture both in and out of the pool will be beneficial and speed up your ability to become a better, faster, more healthy swimmer.
This post was sparked by some discussion in the forums on finding the perfect spearing angle. Here’s my take on all aspects of the spearing angle during Freestyle.
There are two spearing angles: depth and horizontal.
Most people think of spearing angle as mostly depth. Actually, you can also spear at a horizontal angle. Using the shoulder line as center, you can spear inward towards your body centerline – a bad thing to do – or outwards or away from the shoulder line – much better and safer.
Spearing depth angle helps with body balance.
The depth angle at which you spear your hand/arm into the water can greatly affect your balance. Spearing deeper will tip more weight onto the front of your body and bring your hips up like nothing else. Spearing higher is possible, but there is a higher risk of your hips dropping unless you have good control of body balance independent of spear angle.
Spearing horizontal angle can alter direction of travel and affect stability.
You can definitely spear wider of the shoulder lines and still go in one direction. However, spearing in a direction can also start you moving in that direction as well. So horizontal angle spearing acts a method of steering.
We have also found that spearing wider can improve your stability in the water. It provides an anchor on which you can ride your body on its edge, thus improving streamline and reducing drag.
In open water when the conditions get rough, spearing wider can help you stay stable and on course when the water is constantly moving and waves are present.
Spearing angle is dynamic, not static.
Given many different factors, spearing angle can be very dynamic. For example, if you are swimming a long distance using Early Vertical Forearm (EVF) and you are getting tired, you may want to switch to a lower depth, non-EVF spear to recover a little. As mentioned previously in open water, you may need to adjust to different conditions by altering the depth of your spear. In an open water race, you may need to do a turn around a buoy and horizontal spearing angle will help you make the direction change quickly.
Spearing angle can also be dynamic based on what you’re trying to do. For example, when I practice Skate with Kicking, I always spear much deeper than when I swim full stroke because I instinctively know that I go horizontal with a depth of spear, and it helps me kick my way across a pool while in Skate position.
Spearing angle will also change based on your skill level. A deeper spearing angle is great for beginners because it is the quickest way to achieve good balance in the water. But as your skill increases in affecting body balance, you can start spearing more horizontally to learn other aspects like EVF which require a horizontal spear to perform.
Spearing deeper provides many advantages for beginners.
In TI, we teach a deeper spearing angle to most beginners. There are many advantages to this for someone just beginning to learn and imprint good swim habits.
We have already mentioned one, which is a deeper spearing angle is the easiest and fastest way to achieve a horizontal body position. The other ways: pressing the chest, leaning the body, using the weight of the recovering arm, etc. all are much more difficult and require time to master. I have found that spearing deeper is much quicker to learn and affects body balance in a positive manner the most, than any other balance aspect.
Another advantage of spearing deeper is that it helps cure the dropped elbow problem which sets you up for a poor catch and less than effective stroke back. By getting your hand/wrist below the elbow with a deeper spear, you simply cannot have a dropped elbow.
With the hand pointing at an angle downward, we say to relax the fingers and let them droop downward. When this happens, your palm is already nearly, if not fully, facing back and in perfect position to catch and push water straight back. This removes issues with spearing more horizontally with the wrist locked, and then the stroke back happens with either locked straight wrist which results in water being first pushed down – dropping your hips – then pushing back – adding finally to forward momentum – and then pushing water up at the end – again dropping your hips down. A similar thing can happen when the stroke back occurs with a locked straight entire arm.
Deeper spear angles does not necessarily mean you swim slower.
It is true that there is more frontal area exposed on the upper arm to the forward direction of motion when the spear is deeper. In theory, this does mean that a deeper spear should have more drag than horizontal spear. But in reality, we’re only talking about a thin sliver of an arm. When compared to the drag created by dropping hips due to a horizontal spear, the drag of a slightly deeper spear is pretty miniscule. The optimization of this aspect should be left to those who have sufficiently developed their skills such that they need that extra bit of speed to win a race.
There are many swimmers who do not spear horizontally, nor do they use EVF, and still swim VERY FAST. They have awesome body balance and streamline, and they have fully developed their coordination of using the entire body during a 2BK to drive their bodies forward. These factors are much more important in speed than worrying about whether your deeper spear angle creates that much more drag.
If you have to, use the deeper spear to get your hips up. This will give better results than spearing horizontal to attempt EVF but your hips start dropping.
As mentioned previously, when you fully extend your spear, your hand is already in “catch” position. All you need to do from there is pull it back, pushing water straight behind you. Accomplished swimmers will also have perfected their ability to keep their palms pushing water straight back, versus pushing in all sorts of directions other than back.
In order to swim with EVF, you must adjust your spear depth angle to horizontal.
There are many factors related to achieving EVF. One of those is that you need to get your arm as high as possible in order to be able to let the forearm/hand drop below the elbow. If your arm is not horizontal, then your arm isn’t really dropping too much since you are partially “catched” already. You also lose a little bit of stroking length in front of you – spearing horizontal means you can get your arm as far forward as possible and use the full potential of stroke length to push water from front to back.
To many swimmers, there is THE spear angle that they must find. In my experience, spearing angle is a complex, dynamic element of swimming that changes given conditions, fitness and skill level. The ultimate skill, therefore, is to build your ability to swim at a multitude of spearing angles and you can easily switch between all of them depending on what situation you find yourself in.
Graston Technique and Gua Sha generally bring up images of someone taking a blunt metal tool and painfully bruising the heck out of your muscles, but with amazingly positive results. But recently, I have been experimenting with scraping with a lot less force with also positive results.
Watching Gray Cook on his Secrets of the Hip and Knee DVD talk about his use of The Stick, he advises rolling the stick on restricted muscles gently on the affected area 20-40 times in order to achieve some release. He also says to put the muscle in a relaxed and not flexed position or else it could achieve less or negative effects.
Recently, I was having some tightness in my flexor hallucis on my left leg. I tried to calm it down using some vigorous manipulation via a TPMassage Roller, and then a Rumble Roller. I put my calf/flexor hallucis on it and rolled deeply and strongly. I even put a 35lb Kettlebell on my lap to put more weight on the calf. But it reacted negatively; my nerves fired up and then it tightened up reflexively for the rest of the next day!
Generally, Graston scraping involves only 3-6 passes at most over an affected area. A skilled practictioner can often tell how many passes to make and how much pressure to apply. By reducing the number of passes, vigorous and deep scraping can be done but without a negative reaction; instead, a positive reaction results and the muscle calms down as well as releases.
Obviously I had overdone it on my calf and flexor hallucis. But then I remembered what Gray Cook said and decided to try my metal tools in a more gentler fashion.
First I put my foot on a ledge and then pushed up on my ankle BUT I did not flex my calf muscle; I just locked out my ankle to keep my lower leg up on the ball of my foot, and I kept my muscle relaxed. Then I took my Myo-Bar Fascia Bar and gently applied pressure, stroking the muscle about 20 times. It was more like a targeted massage then anything else but nowhere near as vigorous as I did with the rollers nor what a Graston practictioner might do.
This had immediate more positive results. My muscle was much more relaxed and did not have a negative reaction to this treatment. My flexor hallucis unclenched as I worked through the knots and adhesions, smoothing out the muscle and making it functional again.
I then repeated this same thing to my forearms, which were sore from doing chin-ups, grip training, and carrying my newborn daughter around so much. I gently pressed in and moved a Myo-bar Healing Edge I along the muscle lines of my inner forearm near the elbow about 20 times. By next morning, my forearm felt much better – one area which I missed was still sore, which shows that something good had happened from this less forceful manipulation with the tool.
Interesting to see that both deep, forceful scraping can be used as well as more gentle scraping and both have their applications in restoring muscle function.
Here is a current list of muscle scraping tools available now:
Myo-bar – Myofascial tools for IASTM, Gua Sha, FAKTR, and other soft tissue therapies.
Synergy Soft Tissue – Home of the Synergy Tool.
Gua Sha Tools.com – Modern Gua Sha Tools for the Rehabilitation Professional.
The FAST Technique – FAST Tools are the soft tissue mobilization tools that can take myo-fascial manipulation and mobilization to the next level in your practice.
STARR Tool – The Swiss Army Knife of IASTM tools that comes with instructions and demonstration videos.
And for those who are old school:
Gua Sha Shop.com – The number one gua sha tool store.
Yesterday I took an Advanced Total Immersion Seminar in SF with Dave Cameron, a coach who teaches at Minnesota Tri Masters and is known as Distance Dave and has swam the English Channel among other things.
This is a relatively new seminar as most of the ones I’ve seen prior, including the one I took way back in 2003, were more basic. They go through the basic drills of TI which is about all you can do in a few hours, or now over two days. If you’ve never encountered TI drills before, you can only pretty much get to some basic level of mastery of the drills in a few hours.
I am glad to see that they are finally creating seminars which go beyond the basic drills and help us figure out what to do next after we get proficient in the drills.
The session consisted of one hour of swimming, then an hour of video examination, then another hour of swimming. First we were videotaped at the beginning, which we examined during the hour of instruction. In the first hour of swimming, Dave ran us through a whole bunch of new drills, and each time we swam we would have a different focus. This was important, as even though we were swimming freestyle each length, we would have a different aspect of the stroke to focus on and make sure we were doing exactly right.
Some of the focal points we practiced were:
1. Swing the arm on recovery using internal shoulder rotation, don’t jack it up and over. (This was very interesting as it helps prevent shoulder problems by not putting your shoulder in a disadvantaged position during each stroke).
2. Kick in the shadow of your body.
3. Shoot arm forward to the outside, not crossing over.
4. As you extend, feel the stretch diagonally across your body, from your finger tip down your arm, across your chest to the opposite hip.
5. Extend forward arm as much as possible forward.
6. Use hip turn to drive arm forward.
7. As recovery arm comes up, wait, wait, wait (feel the glide), until the last moment to shoot arm forward.
8. Let the catching hand perform catch naturally in front, as recovery arm comes up and then shoots forward into the water.
9. Keep back arm in water (not swiping back the stroke) and then snap arm forward out of water into recovery.
Other things:
1. Don’t be stacked at 90 degrees to water; be angled somewhat, like 60 degrees.
2. To practice the inner shoulder rotation recovery, feel as though you are scraping your bicep across the water. Swing the arm around and don’t lift shoulder.
3. Forward arm needs to be deeper, not so shallow.
4. Avoid DDE (Dreaded Dropped Elbow) upon stroke back.
5. Potentially the kick can be corrected by fixing the track on which we stroke.
6. Somehow today I was able to kick a whole 25 yards in side skate position! I’ve never been able to do that before.
We also worked a bit with the tempo trainer. First we found our nice, comfortable tempo. Then we swam this and they videotaped us. Then we dropped .3 seconds in tempo to simulate a sprint and got videotaped this way too.
After this, Dave will send us all flash drives with our videos along with commentary on each video. I love this part: technology certainly enables great teaching and delivery of materials we can study. I can’t wait to get to the pool and practice, and also looking forward to seeing what Total Immersion comes up with next.
Based on my coach’s suggestion, on the next workout I decided to swim at a higher tempo settings.
After warming up, I set my tempo trainer at 1.6 seconds, swam 4×25, then lowered my tempo by .1 seconds, swam another 4×25, until I got to 1.2 seconds tempo where I determined my comfort breakpoint usually is.
Here are my results:
1.6 seconds, SPL: 13, 12, 12, 12
1.5 seconds, SPL: 4×12
1.4 seconds, SPL: 4×13
1.3 seconds, SPL: 4×13
1.2 seconds, SPL: 13, 13, 13, 14
Once I started getting tired at 1.2 seconds, I drifted to 14 SPL and stopped, knowing I would probably get frustrated with trying to keep my SPL with rising fatigue.
At my next workout, I decided to go even faster. My coach tells me that sprinting tempo is around .8-.9 seconds. I wanted to see what that felt like and whether I could even keep up a decent form. Starting from 1.6 seconds tempo to give myself a bit of warmup, I did 2×25 at each tempo setting until I got .8 seconds.
Here are my results:
1.6 seconds, SPL: 13 12
1.4 seconds, SPL: 13 13
1.2 seconds, SPL: 14 14
1.1 seconds, SPL: 15 15
1.0 seconds, SPL: 16 16
0.9 seconds, SPL: 17 16
0.8 seconds, SPL: 17 17
The fast tempos are too fast for me at this point. My body coordination to stroke, body turn, and kick, as well as breathing at that tempo is a bit too difficult to maintain right now. I also found that I could not maintain my stroking force as well as when my tempo is slower. In order to maintain tempo, I have to reduce my force and just get used to cycling my arms at that speed.
Computation of speed to complete a 25y length is, using my coach’s formula:
1.2 seconds @ 14 SPL: 20.4 seconds
1.1 seconds @ 15 SPL: 19.8 seconds
1.0 seconds @ 16 SPL: 19 seconds
0.9 seconds @ 17 SPL: 18 seconds
0.8 seconds @ 17 SPL: 16 seconds
One of these workouts, I have to time myself to see how accurate these time computations really are.
Observations:
1. I think that I did not “spin” and that I was actually gliding a bit with each stroke. But it was harder to see this effect at the higher speed.
2. I need to find a way to maintain force at higher tempos. To maintain that force is very difficult for me now and also cycle fast.
3. My coach told me that when you cycle faster, you need to stroke shorter, lifting your arm out of the water sooner. Also, everything is happening faster so I have to get used to doing the whole swim movements faster and precisely. At the same time, I need to be as relaxed as when I was swimming with slower tempo. Tensing up just makes me slower and more tired.
4. Like with running, I am going to start neuromuscular training for swimming. I think I will add in a training session where I am just swimming at fast tempo, but not necessarily caring what my SPL is.
It’s been 11 days after IM CDA. Recovery seems to be coming along.
+7 days: Biked for the first time on computrainer, fast one leg spinning. Spinning fast was tough at first and then loosened up. Definitely a bit more effort required than normal to maintain speed.
+8 days: First swim, only 1000 yards. Swam easy and didn’t feel like it stressed my system.
+9 days: Biked neural activation workout at highest maitainable watts which was close to my 100% workout watts, so handling high watts still too hard.
+10 days: Swam 1500. Lots of short drills, some higher stroke rate. System felt good.
+11 days: Biked first in introductory interval series at normal watts. Legs a bit tight but not overly so.
Will start running perhaps tomorrow, definitely next week.
Tracking recovery to a little over 1.5 weeks which is not bad.
Last night it was rainy pretty hard for a while. That really sucks because we’ll have to hand in our bikes tonite and they’ll be left outside, potentially to be rained on overnight before the race tomorrow morning. Today there is some sunshine but still a lot of clouds. Yahoo! Weather for Coeur d’Alene says:

There will be PM showers now with today being pretty nice. Looking on Coeur d’Alene on Weather.com’s hour by hour forecast:


It starts giving us a 10% chance of rain towards noon, and then gets cloudy around 1pm with 30% chance of rain. It really gets dicey at night when the chance of rain jumps to 40-50%. So hopefully this forecast rings true and that we have a relatively rain free morning for the swim and bike, and then if it rains on us during the run it will be miserable, but not as miserable as if it rains on us during the bike.
At Ironman Florida, Gatorade was the sponsor. During the bike, they handed out those Gatorade bottles that resemble water bottles. They have this twist close top which you can suck fluid from. However, annoyingly, they have a smaller diameter than traditional re-fillable water bottles and normal water bottle cages don’t hold them securely. Upon a light bounce of the bike, they go flying much much sooner than normal water bottles. This annoyed me to no end as bounces are accentuated by the XLab Flatwing where my cages were attached to, behind my seat. The only place I’ve found that holds Gatorade bottles is in the cage attached to my seat tube, where I usually keep one in case of hot races where I want to grab a 3rd water bottle and keep it in reserve between aid stations.
However, I did see one guy who had some cages that seemed to hold Gatorade bottles tight. The unfortunate thing was that I totally forgot the brand of the cages I saw!
I finally searched around for cages that might hold Gatorade bottles. Normal ones just don’t cut it. You can bend metal ones to hold them, but then inserting regular water bottles re-bend them back to not holding Gatorade bottles.
Remember: I start with my own water bottles filled with my own formula/fluid. During the race, I pick up extra Gatorade bottles to supplement fluid when needed. So the cages need to accept both regular water bottle diameters and the lesser Gatorade bottle diameter.
I went and bought a Gatorade water bottle and brought it to my favorite bike shop, Cupertino Bike Shop, to try out a few cages. I think I found the right cage: The Specialized Rib Cage Pro Road.
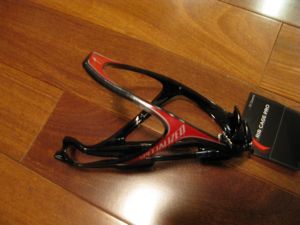
It grips nicely onto the gnurling around the Gatorade bottle, and also somehow can expand to hold both normal water bottles and Gatorade bottles.
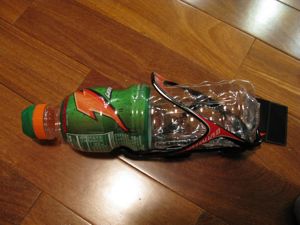
While no cage will entirely hold bottles securely on a big bounce, these should hold them in more conditions than regular cages. With many races having Gatorade as a sponsor, I am glad to have found these cages so that I can feel good about putting them on my XLab Flatwing cages instead of only in my seat tube cage.
If only Gatorade would make their bottles the same diameter as normal water bottles…